This article by Daniel gives more detail about one of the space-saving ideas listed in Becca’s article at Kitchen Stewardship:
I’ve enjoyed rock climbing since I was pretty young, but these days I don’t actually get out to climb on rocks very often. I do tend to climb on stuff at the playground when I take my kids there…but that’s still not as often as I’d like, and most of the equipment isn’t much like rocks. More like ladders. What I like is hard hiking and easy bouldering…not laddering!

This kind of climbing structure is great if you enjoy Laddering.
Playgrounds also are not much fun in bad weather.
There’s actually a commercial indoor climbing gym pretty nearby, but I’ve never been there. It’s probably cool, but somehow it just seems like too much trouble to drive over there and pay somebody and whatever. The more extra layers of process between me and exercise, the less likely I am to get around to it. Still, an indoor climbing wall has definite advantages, and I think they’re pretty cool.
I’d always thought of a climbing wall as something rather exotic…exclusive, expensive, complex. Professionally constructed. Huge. Not something you could just, you know, have.
Something you can’t have!
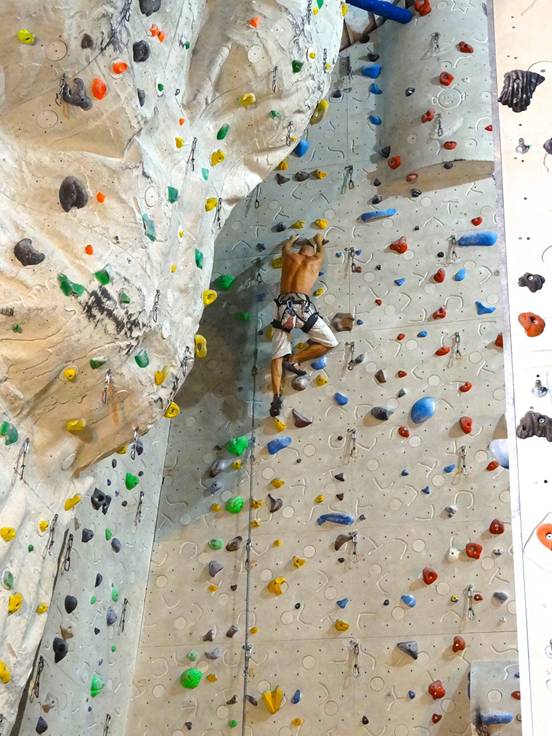
Then I started to notice something: when local playgrounds get equipment upgrades these days, they often add climbing walls. These are usually kid-sized, but Bob O’Connor Playground near our home has a totally vertical wall, maybe ten feet tall, studded with bolt-on climbing holds. The holds are the only really fancy part – sculpted and cast, with a sandy texture. But those can be bought ready-made. The wall is just a plain panel of playground plastic.

Nontrivial playground climbing wall.
That got me thinking: That looks pretty simple. Couldn’t I just build my own climbing wall? I’m a grown-up now, with tools and a sense of how to build things. Isn’t a standard climbing wall really just a big sheet of plywood with some grabby shapes attached?
So I started doing some research.
Sure enough, a climbing wall is just a sheet of plywood with grabby shapes attached. Thanks to the Internet, there’s abundant information on how professional climbing walls are put together, and how to make your own. It was certainly something I could handle. I could have my very own climbing wall! All I had to do was build it…and it would probably even be easy, and cheap!
I’ve learned that when I’m thinking wistfully about something I’ve “always wanted”, I really ought to stop and ask myself, “Well, what would it take to go ahead and make that happen? What do those cost nowadays? How quickly, cheaply, and easily could that dream – or at least the core of it – be achieved this year?” Sometimes the dream remains a dream, but sometimes – like this time – the answer is, “Actually, that would be no big deal. Maybe I should get on with it.”
But a big unknown remained: Okay, yes, I could build a climbing wall…but where could I put one?
We didn’t have a lot of extra space even then, when we only had one child. Our house is smaller than the average American home, and we have a lot of stuff! We do have a full basement, but the ceiling is way too low for a satisfying climb. Our back yard is small, half of it’s so steeply sloped you really don’t want to risk falling, and what about weather?
I even considered, rather than a wall, just a 4”x4” deck post, maybe ten or twelve feet tall, with climbing holds on all four sides. Sort of like a big cat scratching post. I decided against this – I figured the climbing might be uncomfortably cramped – but I still think it’s an interesting concept.
My research revealed that some climbers mount a “training board” over a doorway. This is much smaller than a full climbing wall, but it has a variety of ridges or slots you can hang from, to work on your grip strength in a more basic, exercise-y way than actually climbing to get somewhere. That approach didn’t seem like quite enough to satisfy me, but it did influence my design.
When I was younger, I liked having a pull-up bar across the top of my bedroom doorway. It didn’t take up any floor space, and it reminded me to exercise by being right there in a space I passed through many times a day. Now I spent some time looking at the doorway of my home office.
That door is at the end of a long hallway, which is quite narrow and dark but has a high ceiling: 8 feet 6 inches. There would be room above the door for a training board or a mini climbing wall, a few feet wide and a few feet high…but I really wanted to be able to start from the floor and climb to the ceiling.

Tall thin hallway. (Pay no attention to that ordinary police box.)
Finally I decided that, even though that hallway is only 31 inches wide above the baseboards, I could steal a few inches of width and we’d still be able to get through comfortably. (In fact, we’d been storing two old doors, leaning against one wall, so we knew we could get by with a few inches of floor blocked.) If I kept it thin, I could install my climbing wall right there! It would be out of the way, half-hidden in shadows, but instantly available right off the upstairs circulation hub.
I could turn those few spare inches around the edges of a dim passageway into a whole new zone, the exercise room, while retaining the usable hallway through the middle of it.
Then I spent several weeks just planning and researching materials and techniques. It’s nearly impossible even to hang a picture on the wall you see at left, which separates our rowhouse from the one next door; it’s made of fireproof concrete. The wall at right is only a little less difficult, being made of real plaster rather than the gypsum board typical in newer homes. Anyway, I wanted the climbing wall on the side away from the doorknob to minimize its blocking the door.
So I didn’t want to try mounting a climbable structure on the wall. That meant bracing it against the floor or the other wall. It needed some kind of legs or brackets that would hold it up sturdily without getting in the way. I wanted a structure that wouldn’t damage the house, that would be relatively easy to remove when desired.
I settled on a simple framework made of threaded metal pipes and fittings, not unlike a basic playground swing set or jungle gym. While I was at it, I worked in a pull-up bar and dip handles, and even a place to hang some gymnastics rings.

The Exercise Room. 18 square feet.
Constructing the frame out of “black iron” plumbing pipe had several advantages: It’s readily available at the hardware store, pretty cheap, in assorted lengths, with T- and L-connectors to fit – even adaptors to connect different pipe sizes. The store will even cut long pieces for you and re-thread the cut ends! So I was able to design the whole thing as a “kit”, with no need for any fasteners or adhesives.
The threaded connections are tight enough to make the whole thing pretty solid, but they still can be unscrewed. So with just a wrench to loosen them, I can break down the entire gym into a pile of simple parts in a few hours – like when we got new carpet in the hallway! Took it down before the carpet guys came; put it back up when they left.

The Gym Disassembled (Climbing wall not shown.)
One hitch with this approach: You need the space to screw the thing together, and some configurations are geometrically impossible. Specifically, the top of my gym is a big “H” shape. There’s not really room in that hallway to screw that together. I have to assemble the “H” elsewhere, then bring it into the hallway, and then put the legs on from underneath. And although making a big “H” is awkward, making an “O” – a ring structure – is impossible. There’s no way to screw together the fourth corner.
Now, I wanted a pull-up bar in addition to that main “H”, so I had to cheat. A heavy-duty ratchet strap and a pipe clamp hold one end of the pull-up bar in place, in lieu of a real connection. Inelegant, but effective.

Supporting the pull-up bar end that can’t be connected.
When I first explained my plan, ’Becca was concerned that such a tall, skinny gym would be top-heavy and unstable. If it were freestanding, it would be! Building it to within an inch or two of the wall on each side means that, even if it tries its hardest to fall over sideways, it has nowhere to go.
In practice, it didn’t tip, but it wobbled more than I liked, so I jammed a few pieces of scrap wood between the gym and the wall on each side, with felt feet on the wood to protect the wall. This keeps the gym pretty stable.

Wobble-proofing
(It would be even more stable if the legs were angled, rather than vertical. Triangles and trapezoids give you far more stability than a rectilinear design like a table’s legs. But I went with 90-degree corners anyway. It’s sturdy and safe, just not totally rigid.)
To further control wobble and protect the wall, I wrapped the corners in foam.

Top corner protector
I also put foam tubes (standard plumbing pipe insulators) around the legs near the climbing wall, so you won’t get hurt if you fall against them.

Foam tube on metal pipe
If you’re particularly concerned about falling, I’d recommend a spare foam mattress (if not a real bouldering mat!) on the floor below the climbing wall, and maybe thinner sheets of foam on nearby walls. In my setup, the wall and floor are never very far away from the climber, so the pipe cushioning and the carpeted wood floor have provided adequate protection.
I left the threaded pipes’ plastic protective caps on the gym’s feet. I also put spare carpet scraps beneath them to reduce denting of the carpet and its padding.

Furniture feet
Which brings us back to the climbing wall itself. At the bottom, it stands on the floor; at the top, it hangs from two big “bolts” I made out of more plumbing pipe and end caps. These connect to the main gym frame. The bolts are a few inches long, tilting the climbing wall to an angle slightly beyond vertical – a very subtle overhang. (I could easily swap them for longer bolts, to tilt the wall even further overhead for a more challenging climb. I’m not that good yet. The slight overhang just keeps me from being able to use gravity to lean on the wall.)
Two pieces of scrap lumber act like washers to keep the wall from rattling back and forth on the bolts.

Pipe connectors pretending to be a big bolt
I made the wall out of a 4’x4’ piece of ¾” plywood, cut at the hardware store into two 2’x4’ panels. That gives me an 8-foot-tall wall that’s just wide enough for one person to climb straight up and down. (In retrospect, this isn’t quite wide enough to explore a full range of climbing techniques. I probably should have made it just a foot or two wider.)
The climbing wall’s “legs” are 2×8 lumber from the scrap bin at the hardware store. They hold the two pieces of plywood together and keep them off the floor by an inch or two.
Following standard advice for building a climbing wall, I drilled a bunch of holes in the plywood and fitted them with “T-nuts” from behind. I considered painting the wall but settled for just sanding it – golf tees in the holes keep paint and dust out of the T-nut threads.

Back of a T-Nut in use
In addition to bolt-on climbing holds, there are also screw-on holds that don’t require all this drilling and T-nut business. You just decide where you want them, put in a couple of screws, and go. But that process begins with “decide where you want them” – the advantage of the bolt-on style and a grid of holes is that you can rearrange the climbing routes whenever you like, with nothing but an allen wrench. Since I didn’t expect to make the perfect layout on the first try, I wanted that flexibility. I put in a bunch of T-nuts and bought a bunch of bolts to fit them, and a matching allen wrench.

Threaded hole in plywood, thanks to a T-Nut
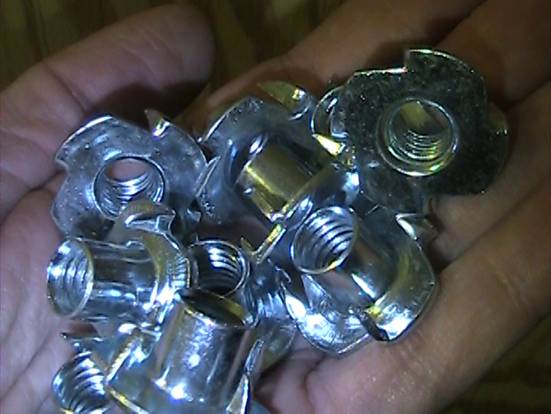
T-Nuts
That leaves only the climbing holds themselves, the carefully chosen simulated rock shapes you actually grab when climbing. My first thought was to just buy some, making this a fully professional-quality climbing wall.
Then I saw the prices. Yikes! Even factory rejects or heavily used climbing holds would have totally unbalanced my budget. This was a very frugal project overall, coming in under $200. Mostly raw hardware, nothing fancy.
I did splurge a bit on the gymnastic rings, which are nice non-rotating plastic rings on adjustable straps. They came with a short training video. I don’t have room for some of the big gymnastic moves, but I really like ring dips and ring rows. I compensated for their cost a bit by being extra-frugal elsewhere: the hooks that hold the rings out of the way when not in use are just bent coat hangers!

Ring on coat-hanger hook
So, minor change of plans. I’d make my own climbing holds from scratch.
The professional ones are cast resin. I know how to do that, but it’s a lot of work; the materials are temperamental and pretty expensive. By the time I got results good enough to use, I’d have spent more than the price of real holds. (Besides, that method is best suited for making multiple copies of the same few designs, not improvising a wide range.)
I considered just bolting on real rocks, but they tend to be sharp and brittle. And heavy. Not ideal. No, there was clearly only one real option for me.
Scrap wood.
My research/shopping had revealed some wooden training boards and many wooden campus boards, so why not carve a range of wooden holds? Wood can sometimes split or splinter, but it’s otherwise easy to work; wood ages gracefully; many kinds of wood are (almost) non-toxic; and I had plenty of scrap wood. I wouldn’t have to spend anything at all, for as many climbing holds as I could use. Take that, expensive product!
Of course, I did need to buy a hand-held electric sander, a cheap “mouse” sander (shaped like a clothes iron)…and another to replace it when it burned out. Sigh. And a good dust mask. Thus, tooling up probably cost as much as buying up to a dozen smallish professional climbing holds. But now I can make as many as I want, as big as I want, and of course I use the tools for other projects too.
So, first I studied climbing hold design for a while. I learned about the different categories of holds, about what makes them easier or harder, by browsing the catalogs of the hot brands. I watched inspiring videos by professional hold designers. I tried to rapidly develop a designer’s sense of what shapes would be safe, fun, and interesting to climb.
Then I just chopped some spare lumber into chunks and started carving them into rounded rocky shapes. I used big Forstner drill bits to mill out (by hand) big slots, and the mouse sander everywhere to sculpt the wood, rounding corners and digging grooves.

Wooden climbing hold with a drilled-out pocket

Rocky carved texture on a wooden climbing hold

A complicated wooden climbing hold with deep pockets
For the mounting holes, I used a Forstner bit to make a recess in each hold, sized to fit a washer, then drilled a big hole through the middle of that space for the bolt itself.

Bolt hole
I tried to create mostly shapes that would be easy to grip because I want exercise more than challenge for now. Also, our son Nicholas was excited about climbing, too, and was only 7 years old at the time.
I also tried to make the holds very asymmetrical, so they could be rotated to present a variety of different climbing experiences. (For example, a comfortable “jug” might become a more challenging “sloper” when turned upside-down.)

Versatile wooden climbing hold
Once I had a bunch of holds carved, I put them up and the project was complete.
As a finishing touch, I put a “ring for service” bell at the top of the wall. This provides a specific, unambiguously measurable goal to strive for: If you haven’t rung the bell, you haven’t climbed the wall! (Ideally, you’ve rung it calmly from a stable stance, instead of lunging desperately for it as you start to fall down!)

Climb wall and ring bell for service.
So that’s my home gym and personal climbing wall. It was a big logistical puzzle to plan and build it, but it’s worked as designed for more than six years now, and I’m very happy with it.
What have you always wanted? Can you just build it?
Is there a zone you’ve wished for in your house, but you don’t think you have space for it? Can you superimpose it over another room?
Do you have a dream that seems out of reach? What would it really take to make it happen this year? Could it be closer than you think?
Check out Becca’s article for 18 other creative ways to save space around the house! Visit Hearth & Soul for lots more household hints!

What a fabulous, creative, space-saving solution, Becca! Pinning and scheduled to share on the Hearth and Soul Facebook page. Thank you so much for being a part of the Hearth and Soul Link party. Hope you are having a lovely weekend!
Pingback: Top 18 Articles of 2018 | The Earthling's Handbook
Pingback: How do I stay so thin? | The Earthling's Handbook
Pingback: Distance Learning Dance Party! | The Earthling's Handbook